Use Spreadsheets to Create or Modify Model Objects
PowerWorld Simulator’s abilities can be extended to include all the power of a spreadsheet application such as Microsoft Excel or Corel Quattro Pro. A simple example is presented here to get you started on this powerful feature.
Consider the simple seven-bus system (B7FLAT.pwb) provided with the software.
B7FLAT Sample Case One-Line Diagram
We are going to describe modifying Load Records in a spreadsheet application for this example; note, however, that this discussion applies to any available object in Simulator. Select Case Information >> Load Records from the Simulator Main Menu. The resulting Load Records case info display is shown below.
Load Records Case Information Display
Note that the text in Simulator’s Case Information displays is color-coded: by default
- BLUE means “enterable”,
- GREEN means “toggle able”, and
- BLACK means the value can not be changed in this display.
The MW value for loads is blue for enterable, so you can change these values. You can modify any enterable or toggle able information directly in a case information by clicking on the desired cell and modifying the data.
This will work fine if you only have a few values to change, but what if you have new forecasts for 4,000 loads? What if these load forecasts are already completed and in a spreadsheet compatible format? Then you can take advantage of the ability to Copy and Paste from the case information displays.
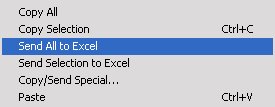
The Case Information Display Local Menu provides options to copy all, copy selection, send all to Excel, and send selection to Excel. (Right-click on a record in the case information display to open the local menu.)
Case Information Display Local Menu (Partial)
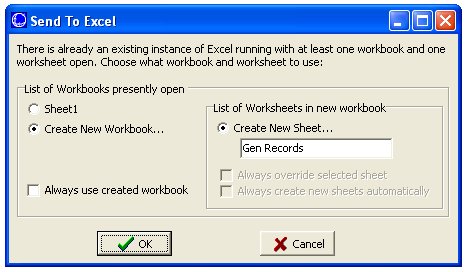
If you are using a spreadsheet application other than Excel, use one of the copy options, then paste the data into your spreadsheet. If sending information directly to Excel, Simulator automatically opens an instance of Excel (if one was not already opened) and pastes the data for you. If there is already one or more instances of Excel running, Simulator allows you to specify how you would like the information pasted:

Send to Excel Options Dialog
What has been pasted to your spreadsheet?
Spreadsheet Example
DO NOT MODIFY INFORMATION IN THE FIRST TWO ROWS!!! The first entry in Cell A1 is a description of the data. The second row stores headers specifying what information is contained in a given column. It is very important to retain the information in the first two rows; when pasting back into the case information displays Simulator reads these rows to determine how to treat the incoming data. Note that if Simulator does not recognize a heading, it ignores the rest of the paste. This allows you to add new columns for performing, as long as the added columns are after the Simulator-specific columns.
Finally, each kind of data record has a number of key fields for Simulator. For instance, for loads this key tells Simulator which load each row refers to. For buses, the key is the Number. For lines, the key is From Number, To Number, and Circuit. For loads, the key is the Number and the ID (highlighted). To paste data into Simulator, all key fields must be included with the paste record.
When creating new records from pasted data, Simulator has additional fields that must be specified – these are called required fields. The easiest method of determining key/required fields for an object type is to open a case information display, right-click on a record and select Display/Column Options from the resulting local menu.
Generator Records Case Info Display – Display/Column Options Dialog
The above dialog shows available fields for generator objects. Check the box markedHighlight Key Fields on the dialog and note the colors displayed on the field labels. Key fields (required when pasting data for existing records) are highlighted in yellow. Required fields (required when pasting data to create new records) are highlighted in green.
You can now utilize the power of your spreadsheet in any manner you wish. Just make sure the final format of the spreadsheet meets the requirements of having the two header rows correct and retains all key fields. Outside of these requirements, you can delete columns and rows of the spreadsheet however you wish.
When you have finished working with the data in your spreadsheet and want to paste back into Simulator, select your entire spreadsheet (the easiest way to do this is to click on top-left square adjacent to A-row label and the 1-column label). Choose Copy. Alternatively, you can select only the desired rows and/or columns, just ensure you include the first two rows in the copied information.
Once you’ve copied the data you want, return to Simulator. Right-click on the case information display and select Paste from the local menu. The message log will show information about the paste action.
A few final notes:
- You can create new records by pasting in all required fields. Note, however, that new records can only be created while in Edit Mode.
- You can only paste values into the case information displays if the values are enterable on the display (shown blue by default).
- You can choose to display either normal headings or variable names for the column headings in case information displays. Select Options >> Solution/Environmentfrom the main menu. Specify either “Normal Headings” or “Variable Names” on theCase Information Displays tab in the section labeled Column Heading Options.
- Be careful about pasting redundant data. For example, in the Bus Records both voltage in per unit and voltage in kV are enterable, but they specify the same information. Make sure you only copy ONE of these columns into Simulator. Otherwise you may not get what you expect. Simulator will paste the value in twice, and whatever value was pasted 2nd will show up.
- Some object fields are tricky; for example, when pasting generator records, if a value is pasted in for Gen MW, then Simulator assumes that you desire to have Gen MW specified. As a result, Simulator automatically sets the AGC option for that machine to “NO.” If you desire to retain the AGC option as “YES” there are number of ways to accomplish this:
- Manually set the AGC option back to YES after pasting the record.
- Include an AGC column after the Gen MW column with the pasted data with the value set to YES
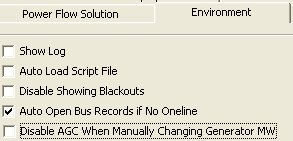
- Select Options >> Solution/Environment from the Simulator Main Menu. On the Environment tab (shown below) uncheck the box marked “Disable AGC When Manually Changing Generator MW.”
Solution/Environment Options Dialog – Environment Tab (Partial)
Tags: How-to,Simulator,Tip,Tutorial
June 28, 2012


