Distributed Computing Setup
Distributed Computation Configuration
- To quickly check the configuration of a given machine, use the Distributed Computation Configuration utility (DistCompCfg.exe in the installation directory of the Simulator version you would like to configure for Distributed use).
- If a step is not configured correctly, the checkbox will not be marked.
- All machines involved in a Distributed Computing setup must be configured, including the local machine to be used to manage the run and each remote machine to be called on.
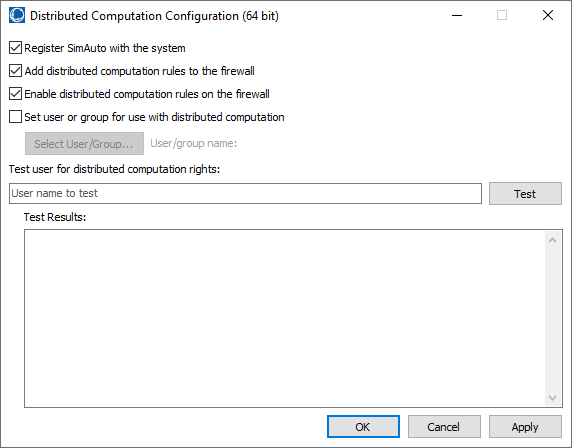
Register SimAuto with the system
- Ensure you have the latest Simulator build installed on all machines. Different builds will not connect to each other for Distributed Computation.
- Mark the Register SimAuto with the system checkbox to ensure the correct version of Simulator is registered (Or use the RegSimAuto utility in the appropriate Simulator installation directory for more options).
Add/Enable distributed computation rules to the firewall
Set user or group for use with distributed computation in a Windows Domain
- Set up a user that will be used to run distributed computation. This user must be a member of the Distributed COM Users group.
- If you are configuring an individual User, the Distributed Computation Configuration utility should manage permissions directly. If you are configuring a Group, however, the steps below may be necessary to manually configure permissions.
- Use dcomcnfg.exe to ensure distributed computation has the necessary DCOM permissions to launch, activate and access.
- Ensure system launch and access limits are configured.
- In dcomcnfg.exe, open the Properties dialog of Component Services -> Computers -> My Computer
- Navigate to the COM Security tab; for both Launch and Activation Permissions and Access Permissions, select Edit Limits…
- Add the user that you configured above and ensure that the user is allowed both Local Access and Remote Access permissions.
- Ensure launch and access permissions.
- In dcomcnfg.exe, open the Properties dialog of Component Services -> Computers -> My Computer -> DCOM Config -> simauto.
- Navigate to the Security tab; for both Launch and Activation Permissions and Access Permissions, select Customize and hit the Edit… button.
- Add the user that you configured above and ensure that the user has all permissions allowed.
- Ensure that the user configured above has all read and execute privileges on the installation folder (usually C:\Program Files (x86)\PowerWorld\Simulator[version] and C:\Program Files\PowerWorld\Simulator[version] for 64-bit Simulator).
Distributed user configuration without a Windows Domain
If you are not working in a Windows Domain, setup is a little more complicated. You will need to configure a local user on the remote machine with the instructions above, as well as a user on the local machine with the same username and password. If you intend to run the local process under a different user account, there must also be a local account on the remote machine with the same username and password.
For example, let’s say your local machine is named “PWLOCAL” and you want to use the machine “PWREMOTE” for remote processing. You will need to configure a user account on PWREMOTE (say, “PWUser”) for DCOM, and create a corresponding “PWUser” account on PWLOCAL with the same password. If you are logging into PWLOCAL with a different account (say, “PWMaster”), then you will also need to create a “PWMaster” account with the same password on PWREMOTE.
Testing configuration
- Ensure that Simulator runs on each machine.
- The Distributed Computation Configuration utility can be used to test that a specified user has the necessary permissions on each machine.
- Enter the specified username into the Test user for distributed computation rights text box, and click the Test button.
- If the test fails, re-check the user configuration steps above and try again.

Configuring Distributed Computer Records on the local machine
- Ensure each remote machine exists in Distributed Computing options on the local machine.
- Open Simulator Options -> Distributed Computing.
- If remote machine is not on the list, click the Insert Computer button and configure the new line with the remote machine’s name or IP address.
- Ensure remote machine has proper credentials.
- Right-click on remote machine row, select Distributed Computer Records -> Add or Change Authentication Info.
- You will be prompted to either enter or create the Master Password.
- Enter remote login credentials when prompted (if user is local to the remote machine, the Domain is the remote machine’s name).
- Verify connection using Verify Computers Available button.
- Any connection errors will show up in the Simulator Log.
Tags: FAQ,How-to,SimAuto,Simulator
September 14, 2017