|
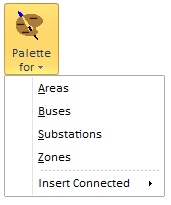
The Insert Palettes can be used in conjunction with the various auto-insert capabilities also found on the Quick Insert ribbon group. These features allow for the creation of oneline diagrams much more quickly than inserting oneline objects one at a time using the Individual Insert ribbon group. When you choose one of the palettes the dialog which appears will look like the image below. The following image shows the Bus Palette. |
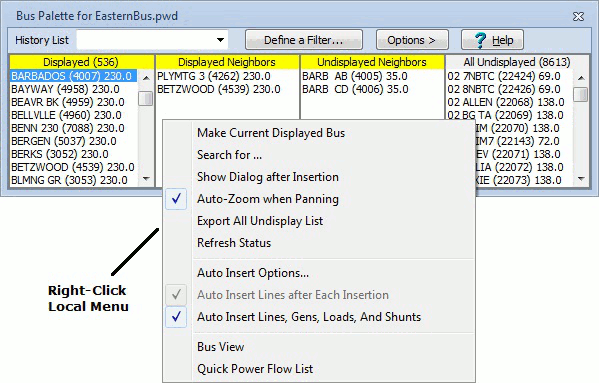
Palettes list the display objects that you have already added to the oneline, the display objects that have not yet been drawn that neighbor those displayed objects, and the set of all display objects that have not yet been added to the drawing.
The display object palettes feature the following controls:
Displayed
Lists those objects defined in the power flow case that have already been added to the oneline diagram. When you click on an entry in the Displayed list, the contents of the Displayed Neighbors and Undisplayed Neighbors lists will be refreshed to identify all objects that neighbor the display object you selected. Only the display objects matching the type of Insert Palette opened will be shown in the list.
Double click on an entry in this list to pan to it so that the selected display object appears in the center of the screen. If you are looking at the Insert Palette for Buses, you can right-click on an entry and choose either Quick Power Flow List or Bus View to learn more about the selected bus.
Displayed Neighbors
Lists those objects defined in the power flow case that neighbor the display object selected in the Displayed list that have already been drawn on the oneline diagram. You can make a "Displayed Neighbor" the selected "Displayed" object by right-clicking on a display object in the Displayed Neighbor List and selecting Make Current Displayed from the local menu. Only the display objects matching the type of Insert Palette opened will be shown in the list.
Undisplayed Neighbors
Lists those display objects defined in the power flow case that neighbor the object selected in the Displayed list that have not yet been drawn. To add the undrawn display object to the oneline diagram, select its name with the left mouse button and keep the left mouse button pressed as you move the mouse to the point on the oneline where you would like to drop the object. When you let go of the left mouse button, the Information Dialog box for that display object will appear. (If you do not want the information Dialog box to appear the use the right-click local menu to uncheck the option to regarding showing the information dialog). Use the Information Dialog to change display parameters for the object and click OK to finish dropping the object onto the oneline. The display object you have just added will be appended to the end of the Displayed list and will also be added to the History List so that you can identify its own undrawn neighbors quickly. Only the display objects matching the type of Insert Palette opened will be shown in the list.
If you are looking at the Insert Palette for Buses, you can right-click on an entry and choose either Quick Power Flow List or Bus View Display to learn more about the selected bus.
All Undisplayed
Lists those display objects defined in the power flow case that have not yet been added to the oneline diagram, regardless of whether the object neighbors a displayed object or not. This list functions identically to the Undisplayed Neighbors List. To add the undrawn display object to the oneline diagram, select its name with the left mouse button and keep the left mouse button pressed as you move the mouse to the point on the oneline where you would like to drop the object. When you let go of the left mouse button, the Information Dialog box for that display object will appear. (If you do not want the information Dialog box to appear the use the right-click local menu to uncheck the option to regarding showing the information dialog). Use the Information Dialog to change display parameters for the object and click OK to finish dropping the object onto the oneline. The display object you have just added will be appended to the end of the Displayed list and will also be added to the History List so that you can identify its undrawn neighbors quickly. Only the display objects matching the type of Insert Palette opened will be shown in the list.
If you are looking at the Insert Palette for Buses, you can right-click on an entry and choose either Quick Power Flow List or Bus View Display to learn more about the selected bus.
History List
Identifies the display objects you have added to the oneline diagram using the insert palettes since the last time you opened the display object palette. Select a name from this list to display the undrawn neighbors of the corresponding display object. Only the display objects matching the type of Insert Palette opened will be shown in the list.
Define a Filter
The Define a Filter button opens the Advanced Filters dialog. This dialog allows you to customize which display objects appear in the various lists. This can be helpful, for example, if you wish to add objects to the oneline that reside only in particular areas, or if you don't want objects less than a certain voltage level to be listed.
When you click OK on the Advanced Filters dialog, the display object palette's lists will automatically be updated to reflect the filter settings.
Close
Click Close when you are done using the display object palette.
Right-Click Local Menu of the Palette
There are several options available on the Right-Click
Search for : Click this option to search through the lists for a particular object. It will open the familiar Find Object dialog.
Auto-Zoom When Panning : When double-clicking on the displayed objects in the palette, you will automatically be panned so that object is in the center of the screen. Check this option to also automatically zoom in/out to a reasonable level at the same time.
Export All Undisplayed List : Choose this option to export this list of undisplayed objects to a text file.
Refresh Status : Choose this option to ensure that the list of Displayed/Undisplayed objects is correct.
Show Dialog after Inserting : check or uncheck this option to control whether the information dialog for the object will appear when using the palette