Data View
Added in Version 20
The Data View provides a mechanism for showing a user-customizable dialog that allows you to view the fields of one object. The Data View is built from the same customization used for the list of fields shown on a case information display. The specification of how to layout the Data View is stored in that same structure. See the topic on Configuring the Case Information Displays. Thus the actual object that stores the customization is the Case Information Customization object (DataGrid, Case Information Customizations Display) and the User Defined Case Information Displays (UserDefinedDataGrid, User-Defined Case Information Displays).
Accessing the Data View
The Data View can be opened from many places within PowerWorld. Also note that multiple Data View may be open simultaneously. The locations of where a Data View can be opened are as follows.
- Case Information Ribbon tab under the Views Ribbon Group or on the Onelines Ribbon Tab under the Views Ribbon Group
- Right-Click Menu of a most case information displays and in the Case Information Toolbar.
- Right-Click menu of many oneline diagram objects
- When left-clicking on any oneline object that links to a model object, then any open Data View will automatically update to reflect what has been selected. It also looks at the secondary objects associated with the selection as well. For example, if you have a Data View open showing an Area object type, then if you left click on a bus the Data View will automatically update to reflect the area of the bus. Take advantage of having multiple Data View open as well by having a Gen, Load, and Shunt Data View open. When clicking on a oneline display object bus then all Data View will update.
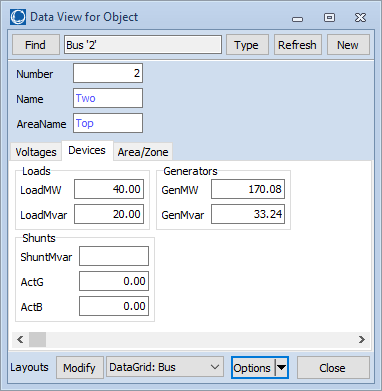
Data View dialog
There are various buttons at the top of the Data View which allow you to choose which object is shown on the data view.
- Click The Find button to choose a different object (but the same type as presently being shown).
- Click the Type button to change the type of object being shown on the Data View (any object type in PowerWorld can be chosen).
- Click the Refresh button to refresh the fields on the dialog for the object being shown. The Data View will stay open while you are interacting with other dialogs in PowerWorld, so it is possible that values have been changed on another dialog and the Data View has not been refreshed to reflect this. Click refresh to ensure they stay up to date.
- Click the New button to open another Data View. There can be multiple Data View dialogs open simultaneously.
There are also various options at the bottom of the Data View .
- Click the Modify button to open the same dialog as seen you get when choosing Display/Column options on a case information display. This allows you to Configuring the Case Information Displays and thus the Data View Layout. This will be discussed more below.
- Click the Close button to close the Data View.
- The drop down list at the bottom of the dialog will show you a list of all customized case information displays (DataGrid) that have actually been customized by the user. In addition it will also list all User-Defined Case information display definitions (UserDefinedDataGrid). You may choose one of these to change the list of fields shown in the middle portion of the Data View.
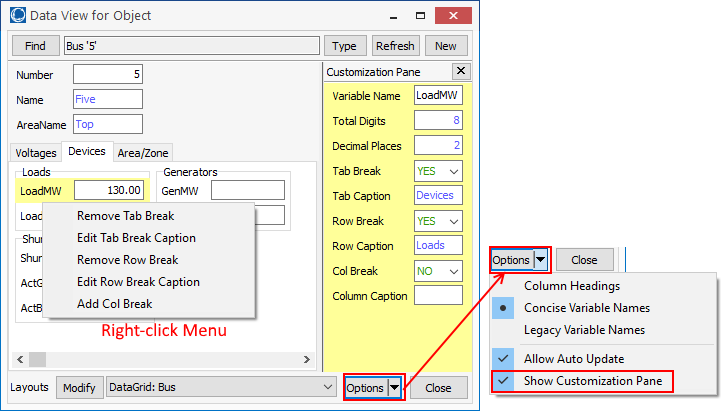
- Options: Choose what captions are shown on the Data View as either Column Headings, Concise Variable Names, or Legacy Variable Names.
- Options: Uncheck Allow Auto Update to prevent the dialog from refreshing to reflect any oneline object that is clicked upon.
- Options: Check Show Customization Pane to show a colored pane along the right side of the Data View dialog. When the Customization Pane is visible, then you may click on a particular field being shown on the dialog and the Customization Pane will show you information about Digits, Decimals, Tab/Row/Col Breaks and Captions as described below. The field will be highlighted in the same color as the Customization Pane as well.
The middle of the dialog shows the fields (according to the DataGrid or UserDefinedDataGrid chosen) for the object (according to the object chosen). The layout of the Data View is described next.
Customization of the Data View Layout
The Data View allows you to layout fields into a tabbed dialog that includes groupings of fields with group captions. The resulting dialog for the Data View can be configured to look as shown in the following figure. Notice the general layout of the dialog which consists of a portion at the top of the dialog containing fields that presumably define which object is being shown. Then below this top portion are a series of tabs. Within each tab, there can then be groupings of fields arranged into rows and columns of groupings.
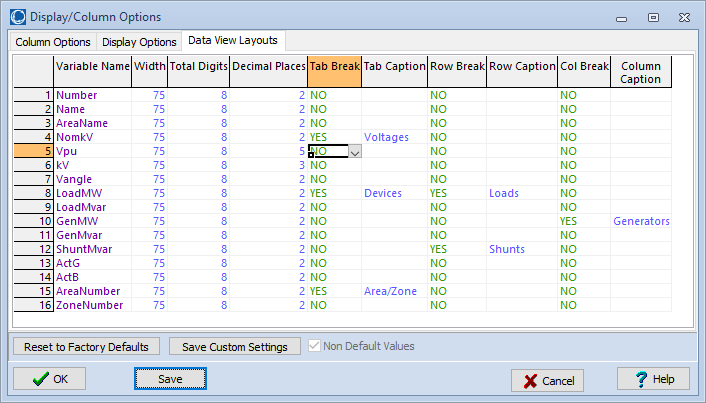
The Data View Layout is built by specifying a value for TabBreak, RowBreak, and ColBreak for each field. For each break that is a YES, you may also specify a TabCaption, RowCaption, or ColumnCaption. TabCaptions are used on the dialog for the tabs. RowCaptions and ColumnCaptions are used as captions of group boxes on the dialog. If the RowCaption or ColCaption are blank then no group box is drawn. The resulting dialog is then automatically created from these choices. The top portion of the dialog is made up of all fields before the first TabBreak. Each list of fields before a subsequent tab break are then shown inside a unique tab. If youdo not want any fields above the tabs, then just specify TabBreak = YES for the first field in this list. Within the list of fields inside a tab, you may then also specify RowBreaks and ColumnBreaks. RowBreaks have precedence over column breaks.
Ultimately the Data View Layout is stored with a Case Information Customization. You may modify this layout in three different ways, but all of these methods are modifying the same entries.
- Customization Pane: Under the options menu, choose Show Customization Pane. You may then click on a particular field on the dialog and the customization pane will update to show the Digits, Decimals, Tab/Row/Col Breaks and Captions for that field. Just edit them directly in the Customization Pane. (See first image below)
- Right-clicking: You may also customize the breaks by right-clicking on the a particular field on the dialog and choosing the options such as Add Tab Break or Remove Col Break, or Edit Row Break Caption (See the left portion of the first image below).
- Display/Column options : the Data View Layout is actually stored as part of the customization of a case information display and can be modified on the Data View Layouts tab the Display/Column options dialog as shown in the second image below.
Example
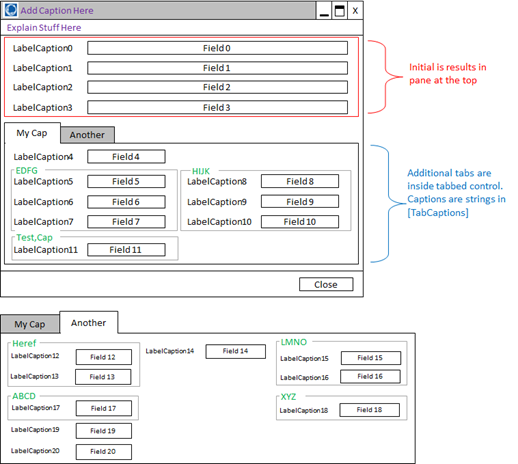
As an example, if you configured 21 fields using the following settings, you would get the dialog as depicted on the right.
|
Variable Name |
Tab Break |
Tab Caption |
Row Break |
Row Caption |
Col Break |
Col Caption |
 |
|
|
Field 0 |
||||||||
|
Field 1 |
||||||||
|
Field 2 |
||||||||
|
Field 3 |
||||||||
|
Field 4 |
YES |
My Cap |
||||||
|
Field 5 |
YES |
EDFG |
||||||
|
Field 6 |
||||||||
|
Field 7 |
||||||||
|
Field 8 |
YES |
HIJK |
||||||
|
Field 9 |
||||||||
|
Field 10 |
||||||||
|
Field 11 |
YES |
Test,Cap |
||||||
|
Field 12 |
YES |
Another |
YES |
Heref |
||||
|
Field 13 |
||||||||
|
Field 14 |
YES |
|||||||
|
Field 15 |
YES |
LMNO |
||||||
|
Field 16 |
||||||||
|
Field 17 |
YES |
ABCD |
||||||
|
Field 18 |
|
YES 2 |
XYZ |
|||||
|
Field 19 |
YES |
|||||||
|
Field 20 |
|
A few notes about this example are as follows.
- Column caption that goes with Field 14 is blank which means that no group box with caption is listed.
- Field 18 has a Col Break specified as "YES 2" to indicate that a column should be skipped and left empty
- Field 12 has both a Tab Break and a Row Break. The Row break is only necessary so that a Row Caption can be specified.