The content and format of all case information displays can be controlled through the Display / Column Options dialog. This dialog can be viewed by choosing  Display/Column Options on the case information toolbar or from the case information display’s local menu. The features on this display can also be accessed on the Model Explorer: Fields Pane.
To reset all case information display properties to their default settings, including column and data field associations, click the Reset to Factory Defaults button.
To save your changes and close the dialog box, click OK. To save your changes without closing the dialog box, click Save. To undo the changes you have specified and close the dialog box, click Cancel. Finally, click Help to view the corresponding help screen.s
While it is normally sufficient to customize the case information displays that comes with the program, it is also possible to create User-Defined Case Information Displays on the Model Explorer. This then provides the ability to switch between different sets of columns, filters, sorting etc. without requiring repeated customizations.
Added in Version 20 Customizing these DataGrids also provides you a way to create custom Data View layouts providing you a mechanism to create custom dialogs. See Data View help for more information.
Column Options
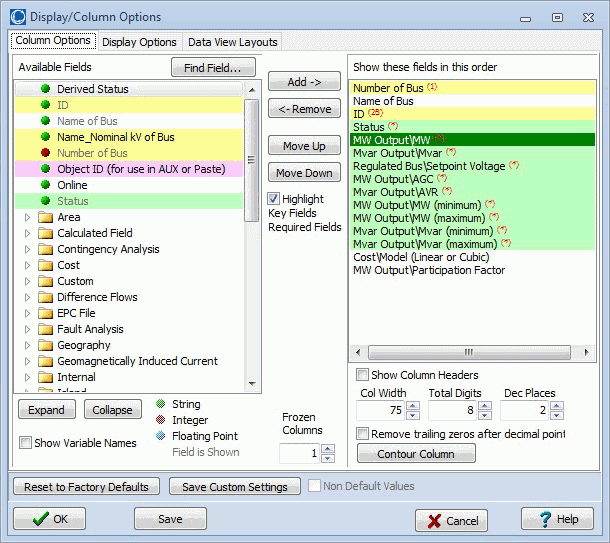
The Column Options Tab is shown in the figure below.

Available Fields
This folder view contains all the fields available for addition to the respective case information display. You may select several entries from this list by holding down the Shift and Control keys. Hold down the control key to select several individual fields. Hold down the Shift key to select all fields between two successive mouse clicks. You may then add multiple fields to the Shown fields (see Add-> below). Fields are generally organized into folder, so make use of the Find Field button if you have trouble finding the field you're looking for.
Note: when the mouse hovers over a field, a hint appears giving a longer description of the field.
Find Field
Click this button to search through the list of fields using wild card search.
Expand and Collapse
Click these button to expand or collapse the folder view showing all the available fields.
Show Variable Names
When this box is checked, the variable name corresponding to each column heading will be displayed in the list of available fields alongside the appropriate column heading.
Green, Red, and Blue dots
Also note that fields that the Green, Red, and Blue dots next to each string represents what type of value it is. Also, fields that are shown with gray text in the available field list represent fields that are already shown and in the list on the right.
Show these fields in this order
This list contains the fields which are presently shown on the respective case information display. Not that the field name is representing using backslash \ characters to signify the folders. You may select several entries from this list by holding down the Shift and Control keys. Hold down the control key to select several individual fields. Hold down the Shift key to select all fields between two successive mouse clicks. You may then remove multiple fields (see Remove below) or move the order of fields (see Move below).
Note: when the mouse hovers over a field, a hint appears giving a longer description of the field.
Column Width
Enter a new value to adjust the physical width of the column. This will affect all fields selected in the Show these fields list.
Total Digits
The number of digits to use when displaying values in the column (including the decimal point.) This will affect all fields selected in the Show these fields list.
Decimal Places
Number of total digits to the right of the decimal point. This will affect all fields selected in the Show these fields list.
Add > (Inserting Columns)
Click the Add > button to add all selected available fields to the end of the Show these fields list. You may also click on the selected Available fields and drag and drop the field on the Show these fields list. When drag/dropping the fields, all selected fields will be inserted just before the field that the mouse is over when you drop the fields. Once you have added fields you may then utilize the
< Remove (Removing Columns)
Click the < Remove button to remove the fields that are currently selected in the Show these fields list. You may also click on the selected fields in the Show these fields list and drag and drop the fields on the Available fields.
Move Up, Move Down (Moving Columns)
If you selected a block of fields in the Show these fields list, you may change the order of the list by clicking on the Move Up or Move Down button. You can also move the selection by left-clicking and dragging to move the columns around.
Also note that if you hold the CTRL key down and then left-click and drag a column heading on the case information display, you can move the columns around relative to one another. You will see red highlighting in the column headings to indicate the position to which the field is being moved.
Highlight Key Fields
Checking this option will highlight the key fields for the type of object displayed in the case information display presently being modified. The fields highlighted in Yellow in the two lists are either the Primary key fields (numbered) or the Secondary key fields (lettered). Note that some key fields, usually the Circuit ID, are both numbered and lettered, meaning they are used as both Primary or Secondary key fields. Either ALL numbered key fields OR all lettered key fields must be included in the list of shown columns if you intend to export the data to either Excel or a text file, modify it, and paste it back into Simulator.
The fields highlighted in Green are the fields that would be necessary in Excel or an auxiliary file in order to create NEW objects of the type displayed when pasting from Excel or reading in an auxiliary file. If all of the green highlighted fields are not present in the external source, Simulator will not be able to create new objects that may be defined in that source, and will only paste information for objects that already exist in the present case.
Frozen Columns
The number of columns that are fixed and do not scroll when you scroll left or right in the display. Frozen columns will have a background color of gray instead of white. The number of frozen columns is 1 by default.
Data View Layouts Added in Version 20
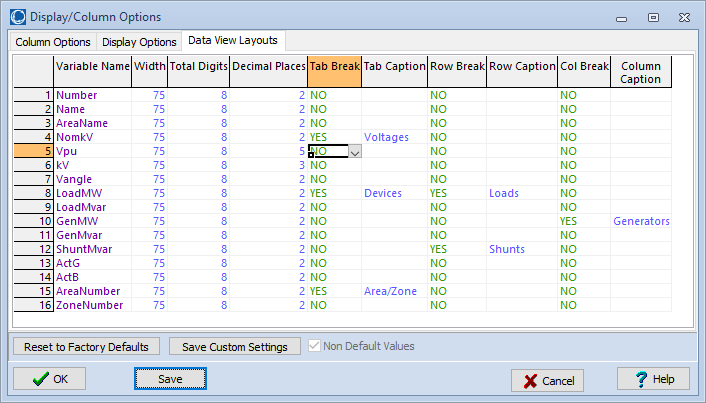
Added in Version 20 Data View Layouts provides a location to modify how the fielssds in this particular case information display will be rendered when shown on the Data View. For more information about where a data view can be accessed see the help documentation on data views. This is the location where you can edit where any Tab, Row, or Column breaks occur on the Data View.

Display Options
Use Area / Zone Filters
Check this box to restrict the case information display’s record set to cover only those areas and zones specified by the area/zone/owner filters. If this box is unchecked, all records, regardless of zone or area, will be displayed. (The area/zone filters option obviously does not apply to the Area/Zone Filters information display.)
Advanced Filter
Clicking this button will open the Advanced Filters Dialog, which will allow more detailed filtering on the display.
Zoom
You can zoom in and out on a case information display by using the keyboard short cut Ctrl+Up and Ctrl+Down. Alternatively you can zoom in out by setting a percentage on this dialog. This can also by modified under the Options Menu of the Case Information Toolbar.
You can also zoom in and out on case information displays by CTRL key down and using the Mouse Wheel up and down. Added in Version 23, build on May 7, 2024
Use Custom Font / Row Height
If checked, then the Row Height and Custom Font specifications will be used. Changing either the Row Height or Custom Font properties will cause this box to become checked automatically. If you wish not to apply your custom specifications to the active case information display, uncheck this box; the default font and row height settings, as defined under the Case Information Displays tab of the Simulator Options dialog box or under the Options Menu of the Case Information Toolbar, will be reapplied.
Row Height
Defines the height of the rows of the case information display.
Change Custom Font
Defines the font with which to display the records.
Set as Default
Sets the current Font and Row Height as the defaults.
Auto Size all Column Widths
Constrains all field widths to contain the widest data elements in each column.