The Contingency Definition Dialog (shown below) serves as an information source for displaying the Contingency Element (or Elements) associated with individual contingencies defined in the case. You can use the Contingency Definition Dialog to scroll through the list of elements, to view and modify their definitions, to insert new elements in a contingency or to delete a contingency. You may access this dialog by choosing either Show Dialog or Insert from the local menu of the Primary Contingencies Display.
After making changes, click OK to save your changes and close the dialog. Click Cancel to close the dialog without saving your changes. Click Save to save your changes (including the addition of a new contingency) without closing the dialog (this allows you to keep working with the dialog). Click Delete to remove the selected contingency from the contingency list.
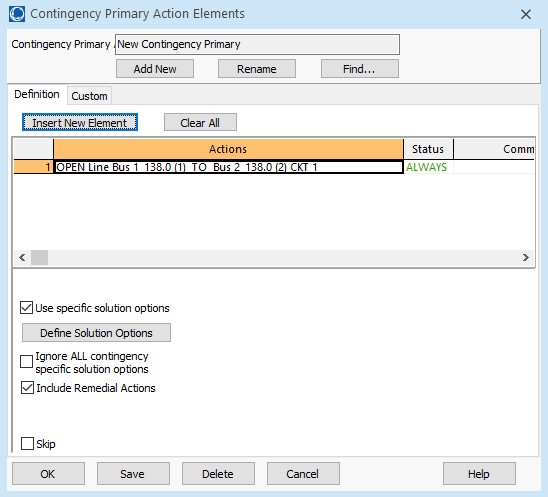
Contingency Primary Actions Elements Dialog
The Contingency Primary Actions Elements Dialog has the following controls that are available regardless of the tab that is currently selected:
Contingency Primary Label
Identifies the name of the currently displayed primary contingency.
Add New
Click the Add New button to add a new primary contingency to the contingency list for the case. You will be prompted to enter a unique name for the new contingency. After naming the new contingency, the name appears in the Contingency Label and you can insert new elements in the contingency definition.
Rename
Allows you to rename the selected primary contingency.
Find
Opens a dialog that will allow the use of advanced search methods for finding a particular primary contingency.
Definition Tab
Insert New Element
Click this button to add a new element to the contingency. This will open the Contingency Combination Element Dialog, used to define the Action, Model Criteria and Comment associated with the element. When you return to the Contingency Definition Dialog, the display will contain the newly inserted element.
Clear All
Removes all elements from the contingency definition. The Contingency Elements Table will then appear blank, indicating that the contingency involves no associated actions.
Definitions Display
The Primary Contingency Definitions Display lists the elements assigned to the selected contingency. Select Insert from the local menu or click on the Insert New Element button to add elements to the contingency. Right-click on a specific element in the display and select Delete from the local menu to remove the element from the contingency.
Define Solution Options
Click this button to open the Contingency Solution Options Dialog, used to define specific power flow solutions options for use under the selected contingency.
Use Specific Solution Options
Check this box to enable the use of Contingency Specific Solution Options (see Define Solution Options above).
Ignore ALL contingency specific solution options
If checked, all contingency specific options, either defined individually for the specific contingency or defined globally in the contingency options for all contingencies, are ignored. The solution options as saved with the case will be used.
Include Remedial Actions Added in Version 20
Check this box to include Remedial Actions and Global Actions with this contingency.
Skip
Check this box to skip the Primary Contingency from the analysis when pressing Run in the Contingency Combination Analysis Dialog.
Custom Tab
The Custom page of the dialog contains two sections: custom fields and memo.
The custom fields section allows access to setting and changing the values for custom fields that have been defined for the contingency. Defining custom fields is detailed in Custom Field Descriptions.
The Memo section of the dialog is simply a location to log information about the contingency. Any information entered in the memo box will be stored with the case when the case is saved to a PWB file.