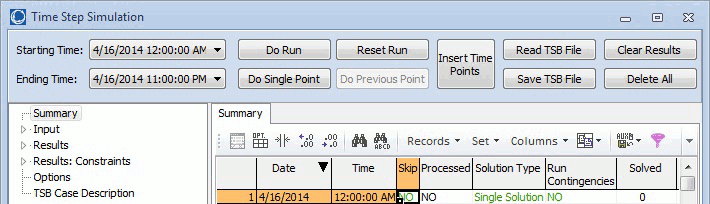
The Time Step Simulation dialog is used to control and visualize the time simulation. The top section of the form contains buttons for data input/output and buttons to control the progress of the simulation. The main part of the form has a number of Time Step Simulation pages that contain grids and options where input data can be specified and simulation results can be examined.
Input/Output Buttons
Insert Time Points
Press this button to open the New Timepoint Dialog that allows specification of time point starting date and time, number of time points to enter, and the interval between time points.
Read TSB File
Press this button to read a Time Series Binary file (.tsb File). This files stores input and scheduled data, the simulation options and the results.
Save TSB File
Press this button to save the input, custom inputs and scheduled data, the simulation options, and the results and custom results in a Time Series Binary file (.tsb file).
Clear Results
Press this button to clear any results stored with the time step simulation.
Delete All
Press this button to delete all information associated with a time step simulation including, results, selection of objects and fields for results, schedules, schedule subscriptions, and time points.
Simulation Control Buttons
During the solution, the Time Step Simulation solves each time point in a sequential manner. During this process, the Simulation can be in one of three states:
- Reset: When the simulation has not started, when it has been completed, or when it has been paused and then reset.
- Running: When the simulation is solving time points sequentially.
- Paused: When the user has paused the simulation. The simulation actually waits until the present time point is solved in order to pause. If the simulation includes an SCOPF solution, all the contingencies are processed and the system is optimized before the simulation is paused. Note that once a time point is solved its results are available on the various grids.
The user controls the Time Step Simulation by means of the following control buttons:
Starting Time
Use this selector to specify a start time point other than the first time point in the list. The simulation will disregard the time points before the selected start time point.
Ending Time
Use this selector to specify an end time point other than the end time point in the list. The simulation will stop after processing the selected end time point.
Do Run [Pause Solution, Continue Solution]
Press this button to initialize the Time Step Simulation and go through all the time points until the last time point or a time point with theSkip field set to Pause is found. As the simulation takes place, the Last Result Boxwill be updated with messages. In addition, the Summary page will change the Processed and Solved fields from NO to YES, reflecting the simulation progress. The Results grids will be updated once the solution for a time point has been found.
When the Simulation starts, the simulation status changes to Running, and the Do Run button changes its caption to Pause Solution. Press this button to pause the Solution. The simulation will continue until the current time point is solved entirely. Once the Simulation status is set to Paused, the Do Run button caption changes to Continue Solution. Press this button to continue the solution.
Do Single Point
Use this button to solve the next time point. You can see the last processed point in the Last Result box. You can also select a specific starting point by using the Starting Time selector.
Do Previous Point
Use this button to solve the previous time point. You can see the last processed point in the Last Result box. You can also select a specific starting point by using the Starting Time selector.
Reset Run
Use this button to go back to the first time point and initialize the simulation. This action does not delete the results of the time points processed so far, but it resets all the Processed fields to NO.

Last Result
The last result box in the lower left corner of the dialog is used to show solution progress messages. The messages indicate correct solutions or errors in the solution of the particular time point. It also shows the progress of the contingency analysis during a SCOPF solution.
Present Time
If you are solving the time points using a timed simulation, the Present Time of the process is displayed in this field.
Refresh All Displays Each Time Step
Check this box to have all displays refresh after each time step. This could slow the process down if there are a number of displays open.