PV Curves: Limit Violations
The Limit Violations tab is found on the PV Curves dialog. There are two sub-tabs that allow for the definition of what is considered a critical scenario that will force the PV process to stop and what is considered a violation for monitoring only.
The options on the Critical Scenarios sub-tab will force the PV process to stop and consider a scenario critical if the defined criteria are met.
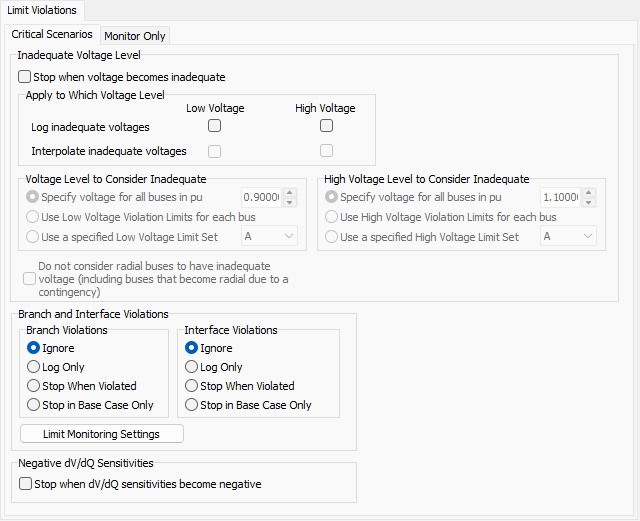
Inadequate voltage level
Voltages can be considered inadequate if they are low or high. Similar options exist for specifying the voltages to consider inadequate, whether high or low.
Stop when voltage becomes inadequate
Checking this box will stop the PV process for a scenario when any monitored bus voltage falls below the voltage level to consider inadequate or exceeds the high voltage level to consider inadequate. The Limit Monitoring Settings dictate which buses are monitored.
Log inadequate voltages
Check the appropriate box to store inadequate low or high bus voltages encountered for each scenario. The Limit Monitoring Settings dictate which buses are monitored. Lists of inadequate voltages for each scenario and transfer level will then be available for viewing as local menu options obtained by right-clicking on the Overview table (PV Curve records > Show Inadequate Voltages or PV Curve records > Show Inadequate High Voltages). Inadequate voltages will also be stored in the SUBDATA section of the PWPVResultListContainer DATA section when storing PV results to an auxiliary file.
Interpolate inadequate voltages- If checked add the ability to estimate at what transfer level a voltage becomes inadequate by linearly interpolating between the two transfer levels where it goes from adequate to inadequate. It also will interpolate if an inadequate voltage occurs at the zero transfer level to determine the negative transfer at which the voltage becomes inadequate.
There are several fields available on the Overview table that provide summary information about low inadequate voltages:
Inadequate Voltage Nominal Shift- nominal transfer level at which the first inadequate low voltage is recorded
Inadequate Voltage Worst Voltage- minimum voltage of all buses that have inadequate low voltages at the Inadequate Voltage Nominal Shift transfer level
Inadequate Voltage Worst Voltage Bus- bus with the minimum low voltage of all buses that have low inadequate voltages at the Inadequate Voltage Nominal Shift transfer level
Inadequate Voltage ATC Mon- if any ATC Extra Monitors are being tracked during the analysis, this will list of the flow on the given extra monitor at the Inadequate Voltage Nominal Shift transfer level
If choosing to Stop when voltage becomes inadequate, no inadequate voltages will be stored even if this option is selected. When a scenario becomes critical because of inadequate voltages, the results that are given in the Overview table are from the last transfer level at which all voltages were adequate. The inadequate voltage reported in the results is the voltage that would be inadequate if we went beyond the reported transfer level. Because of how the reporting works to report the last non-critical results, it makes sense that there would not be any inadequate voltages stored.
The inadequate voltage thresholds when choosing to either stop or log inadequate voltages are determined by the following options. Options exist for specifying both the low and high inadequate voltage thresholds:
Specify voltage for all buses in pu - specify a single inadequate voltage threshold to be used for all monitored buses
Use Low Voltage Violation Limits for each bus or Use High Voltage Violation Limits for each bus - use the limit monitoring settings
Use a specified Low Voltage Limit Set or Use a specified Low Voltage Limit Set - select a limit set to specify the limit from the drop-down. Up to four (A-D) specific limit sets can be specified for a bus. When using this option, all monitored buses should have the selected limit set specified. If not, the default voltage limit will be -1.
Do not consider radial buses to have inadequate voltage (including buses that become radial due to a contingency) - check this box to exclude monitoring buses that are radial regardless of whether they are radial because they are connected to the system by a single line or because they are radial because they are connected to the system via a single in-service line (i.e. they could have more connections but all but one of the connections is open).
This option works somewhat in conjunction with a similar option found on the Limit Monitoring Settings dialog. The option Do not monitor radial lines and buses found on the Limit Monitoring Settings dialog will exclude any bus from monitoring if it is radial in the base case. This limit monitoring settings option considers buses to be radial if they are connected by a single branch and only a single branch. When the limit monitoring settings option is selected, radial buses by that definition will be excluded from the PV monitoring. When the PV option is selected, buses that are connected by only a single in-service branch after the application of any scenario contingency, or in the base case if there is no contingency, are considered radial and will be excluded from the monitoring. The PV option is enforced regardless of whether or not the option with the limit monitoring settings is selected.
Stop when dV/dQ sensitivities become negative
Checking this box will treat negative dV/dQ bus sensitivities as a critical scenario. If this option is used and there are negative dV/dQ sensitivities, the critical transfer level will be determined by backing off the transfer to the point at which no dV/dQ sensitivities are negative.
Buses that are monitored for negative dV/dQ sensitivities are the buses that are set to have their dV/dQ sensitivities tracked with the Quantities to Track setup.
Branch and Interface Violations
Branch and interface violations can be monitored or treated as critical scenarios. Limit Monitoring Settings determine which branches and interfaces are monitored and the limits that should be used for determining violations. For each type of element the following options are available:
Ignore - completely ignore violations
Log Only - log the violations. If there are any logged violations the Overview table will have entries for Show Branch Violations and Show Interface Violations.
Stop When Violated- treat a violation as a critical scenario and stop the analysis of a scenario when a limit is encountered
Stop in Base Case Only - only treat the base case scenario as critical and stop the analysis of this scenario when violations are encountered. Contingency scenarios will continue processing if violations are encountered.
The options on the Monitor Only sub-tab are for reporting purposes only and will not force the PV run to stop.
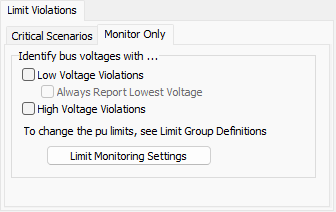
Identify bus voltages with...
These options will store monitored bus voltages that violate either their high or low voltage limit as of the last successful solution for each scenario. Only those buses that are set to be monitored based on the Limit Monitoring Settings will be monitored, and the low and high voltage limits for each bus are also determined by the limit monitoring settings.
Low Voltage Violations - check this box to store the buses that have low voltage violations
Always Report Lowest Voltage - check this box to always store the lowest voltage even if it is not a violation
High Voltage Violations - check this box to store the buses that have high voltage violations
Limit Group Definitions - click this button to open the Limiting Monitoring Settings dialog
When choosing to identify limit violations, the Overview table on the PV Results tab will contain information about the number of violations (#Viol), worst voltage violation (Worst V Viol), and bus at which the worst voltage violation occurs (Worst V Bus). Also, for any scenario in which a violation occurs, the Show Violations option is enabled on the local right-click menu of the Overview table. Choosing this option will open a table detailing all of the violations.